

Commission disclosure: This article includes a promotional link to Blog2Vid. The guidance is educational first: it explains a practical workflow you can use with software, a freelancer, or a manual process.
If you have a blog post that already helps people, turning it into a video can extend its reach to readers who prefer watching or listening. The real challenge for beginners is not “making a fancy video”; it is converting a written article into a clear, watchable format without losing the point. The outcome you want is simple: a repeatable process that turns one useful post into one useful video, with the right structure for the channel.
This guide is for bloggers, creators, affiliates, and small teams who want a realistic workflow rather than a technical deep dive. If you want a broader commercial evaluation of the tool itself, see the Blog2Vid review pillar. For adjacent planning help, the repurposing decision guide, blog-to-video SEO notes, quality checklist, and best use cases guide can help you decide when video is the right format.
Direct Answer & Introduction
The short answer
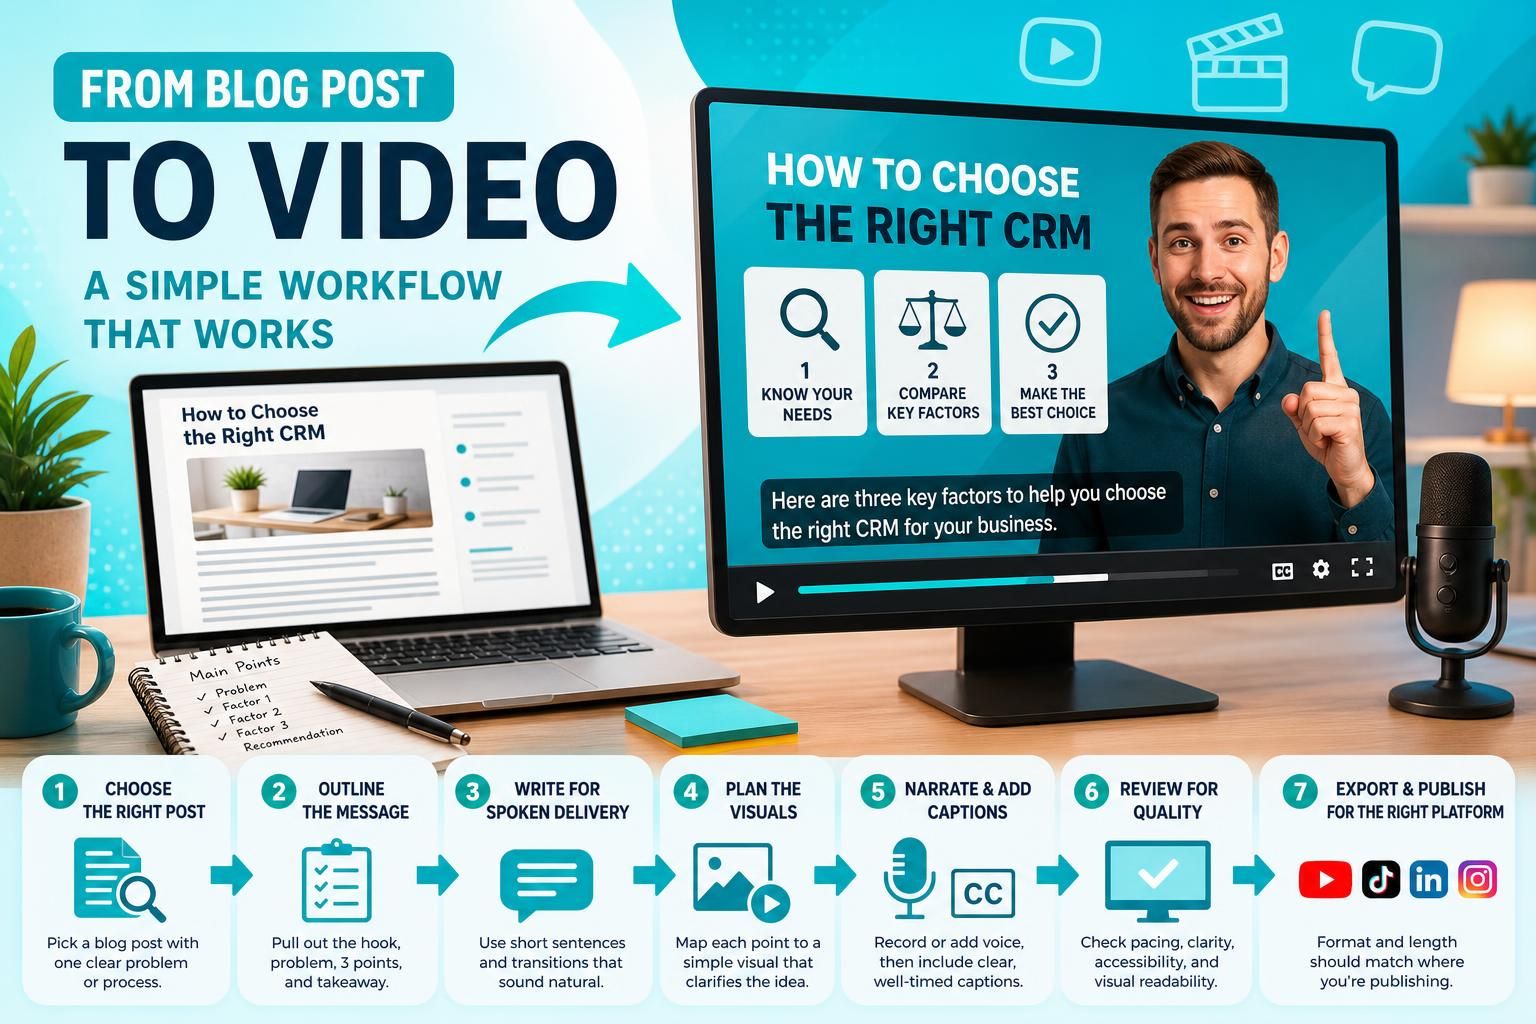
To turn a blog post into a video, choose one article with a clear point, reduce it to a short spoken outline, plan simple visuals that support each idea, add narration or text-led slides, include captions, and export in a format that fits the platform. For beginners, the smartest approach is usually to make a smaller, clearer video than to force the entire article into one long edit.
Who this helps
This workflow is especially useful if your blog content is already strong but not getting enough distribution. Video can help people understand the same idea faster, share it more easily, and engage with it in a different setting. The trade-off is that repurposing adds editorial work: a weak post will still be weak in video form, and an overstuffed conversion can feel harder to follow than the original article.
What success looks like
Success is not “turning every post into a blockbuster.” Success is creating a video that preserves the article’s main value, feels natural to watch, and matches the audience’s attention span. If the video makes the idea clearer, that is a win. If it only adds motion without clarity, it has probably missed the point.
Fundamentals
What blog-to-video repurposing actually means
Repurposing is translation, not duplication. A blog post relies on headings, paragraphs, examples, and scanning. A video relies on timing, visuals, narration, and captions. The core idea stays the same, but the delivery has to be simplified so viewers can follow it quickly and without reading a full page.
The essential building blocks
A beginner-friendly workflow usually has six parts. First, source selection: pick the right article. Second, scripting: turn the article into spoken language. Third, visual planning: decide what appears on screen for each beat. Fourth, narration or text-led delivery: choose voiceover, captions, or both. Fifth, accessibility and quality control: make sure the piece is readable and understandable. Sixth, export: match the video format to the destination platform.
What makes a good source article
The easiest articles to convert are those with one main question, one process, or a small number of practical points. How-to posts, checklists, and focused explainers usually convert more cleanly than broad essays or deeply technical references. If the post is too vague, too long, or too dependent on tables and footnotes, it may need trimming before it becomes video-friendly.
That does not mean every short post is automatically a good candidate. The best source is a page with a clear promise and a structure that can be compressed without losing meaning.
Main Process / Strategies
Step 1: Choose one article and one goal
Begin with a single post and a single purpose. Are you trying to educate, summarize, support a product page, or create a social clip? The goal affects everything else. A tutorial video needs more explanation; a short awareness clip needs less. If you try to serve every goal at once, the result usually becomes too long or too vague.

Example: a post titled “How to Set Up an Email Welcome Sequence” is easier to convert than a broad thought piece about marketing trends. The first has a visible sequence; the second has too many possible angles. That clarity matters because video rewards tight structure.
Step 2: Reduce the article to a video outline
Do not copy the article paragraph by paragraph. Pull out the hook, the core problem, three main points, and a short closing takeaway. For many beginners, a five-part structure works well: hook, problem, three steps, recap, next action. If the article is long, consider converting only the best subsection instead of the whole page.
Practical rule: if a sentence does not help the viewer understand the point quickly, it probably does not belong in the video. Blog writing can be expansive; video writing has to be selective.
Step 3: Rewrite for spoken delivery
Blog sentences often sound natural on the page but stiff in narration. Rewrite them into short, direct, spoken lines. Favor active verbs, short clauses, and obvious transitions such as “first,” “next,” and “here’s the catch.” This does not mean dumbing the content down. It means removing friction.
Example script move: “This article explores several methods for improving distribution” becomes “Here are three simple ways to get more mileage from one blog post.” The second version is easier to say, easier to hear, and easier to remember.
Step 4: Plan visuals before you build them
Visuals should clarify the message, not compete with it. You do not need complex motion graphics to make a useful video. Simple title cards, screenshots, icons, comparison cards, process diagrams, and short text slides are often enough. If the article explains steps, show steps. If it compares options, show side-by-side choices. If it defines a concept, use a clean visual and a plain explanation.
Worked example: if your blog post explains how to choose a CRM, the video could show one problem statement, three decision factors, and a final recap. That is usually clearer than a stream of unrelated stock clips. The job of the visuals is to support the decision, not distract from it.
Step 5: Choose narration, text-led slides, or a mix
Different topics need different delivery styles. Narration works well when the article has a process or story. Text-led slides work well when viewers may watch with sound off. A mix can be strongest for most beginner projects. Whatever you choose, keep the frame readable. If the screen is crowded with text, the viewer has to work too hard.
If you use synthetic voice, test the pacing and tone against the subject. Calm educational content usually benefits from calm delivery. Faster delivery may suit short social clips, but it can feel rushed if the topic needs explanation.
Step 6: Add captions and accessibility support
Captions help viewers in noisy places, on mute, or with accessibility needs. They should be timed well, easy to read, and not placed over busy backgrounds. Use strong contrast, a legible font, and line lengths that do not overwhelm the frame. If a visual element matters to the meaning, the narration or on-screen text should still explain it.
Example: if your video shows a comparison chart, do not rely on tiny labels alone. Say the comparison out loud and keep the chart simple enough to scan quickly.
Step 7: Export for the channel you actually want
Do not treat one export as universal. A vertical short, a landscape tutorial, and an embedded blog video are different outputs. Decide the destination first, then shape the runtime and pacing around that destination. A short social post should usually focus on one takeaway. A YouTube tutorial can be more complete. An embedded video can sit somewhere in between.
Mini workflow example
Example: a 1,200-word post about choosing a CRM can become a 60- to 90-second video by extracting the opening problem, three decision factors, and one closing recommendation. The visuals might be a title card, three comparison cards, and a final recap. The script would use shorter sentences, and the captions would match those shorter lines. That gives you a focused asset without trying to compress the full article into a single watch session.
Where software can help, and where judgment still matters
A tool can speed up scraping, drafting, scene assembly, or formatting. That matters if you need volume or consistency. But the publisher still has to judge whether the source is worth repurposing, whether the script sounds natural, and whether the video fits the audience and platform. For readers comparing workflows, the Blog2Vid product page is the commercial review pillar that covers the front-end offer and broader product context.
FAQs, Mistakes & Expert Insights
Common mistakes to avoid
The most common mistake is trying to cram the entire blog post into the video. That usually creates a crowded script and too many visual ideas. Another common issue is leaving the article language unchanged, which makes the narration sound stiff. A third mistake is ignoring pacing: if scenes change too fast, viewers cannot follow the point; if they change too slowly, they lose interest. A fourth is treating captions as an afterthought instead of part of the design.
Misconceptions about repurposing
One misconception is that more motion automatically means better results. In practice, clarity usually matters more than movement. Another misconception is that every blog post should become a video. Some pages are reference material, not performance content. A third is that the video must include every example from the article. In many cases, a focused excerpt is more effective than a full conversion.
Nuanced insight: text and video do different jobs
Text is often better for depth, scanning, and precise reference. Video is often better for demonstration, pacing, and quick comprehension. That means the strongest strategy is not replacing the article with video. It is using each format for what it does best. A good blog post can stay useful on the page while the video reaches people who would never read the full article.
Nuanced insight: originality still matters
If you are repurposing your own article, you are mostly translating your own message into another format. If you are adapting external material, you need to be more careful. Do not assume that copying structure, phrasing, or examples is automatically acceptable just because something is public. The safer approach is to build an original script around the idea, then make sure the final video is clearly your own work.
FAQ: Do I need a long blog post to make a video?
No. A short, specific article can work very well. The real question is whether the post has one clear idea that can be explained visually and spoken aloud. A concise how-to or checklist is often a better beginner project than a sprawling article.
FAQ: Should I turn every blog post into a video?
No. Posts that are highly technical, heavily reference-based, or meant mainly for internal support may not need a video version. Video works best when the topic benefits from demonstration, quick explanation, or social sharing. Keep text-only content when the article’s main value is depth, precision, or easy scanning.
FAQ: What if I do not have editing experience?
Start with a simple format: one headline, a few slides or scenes, clear captions, and a short voiceover. You do not need advanced animation to make something useful. The priority is a clear structure and readable delivery. As you get faster, you can add more polish.
FAQ: How do I make the video accessible?
Use strong contrast, readable fonts, good timing, and captions that match the spoken lines. Keep visual clutter low. If a visual matters to the point, explain it in words too. Accessibility is not just a compliance concern; it also makes the video easier to follow in normal viewing conditions.
FAQ: What should I prepare before using a blog-to-video tool?
Prepare the source article, the main point, the intended audience, the destination platform, and any brand style preferences. If you already know the desired length and tone, the workflow becomes much easier. Tools can speed up assembly, but they work best when you supply a clear starting point.
Do I need a long blog post to make a video?
No. A short, specific article can work very well. The real question is whether the post has one clear idea that can be explained visually and spoken aloud. A concise how-to or checklist is often a better beginner project than a sprawling article.
Should I turn every blog post into a video?
No. Posts that are highly technical, heavily reference-based, or meant mainly for internal support may not need a video version. Video works best when the topic benefits from demonstration, quick explanation, or social sharing. Keep text-only content when the article’s main value is depth, precision, or easy scanning.
What if I do not have editing experience?
Start with a simple format: one headline, a few slides or scenes, clear captions, and a short voiceover. You do not need advanced animation to make something useful. The priority is a clear structure and readable delivery. As you get faster, you can add more polish.
How do I make the video accessible?
Use strong contrast, readable fonts, good timing, and captions that match the spoken lines. Keep visual clutter low. If a visual matters to the point, explain it in words too. Accessibility is not just a compliance concern; it also makes the video easier to follow in normal viewing conditions.
What should I prepare before using a blog-to-video tool?
Prepare the source article, the main point, the intended audience, the destination platform, and any brand style preferences. If you already know the desired length and tone, the workflow becomes much easier. Tools can speed up assembly, but they work best when you supply a clear starting point.
Summary & Next Steps
The beginner-friendly decision
If you want to turn a blog post into a video, keep the process simple: choose a strong article, shorten it to one message, plan the visuals, write for the ear, add captions, and export for the channel you actually want. That is realistic for beginners and scalable for teams.
What to do next
Start with one existing article instead of trying to build a whole system at once. Pick a post that already helps people solve a problem, then convert only the most important part into video. After that, compare how the blog and the video complement each other. If you want the commercial side of the workflow, read the Blog2Vid review pillar. For adjacent planning help, see the repurposing decision guide, blog-to-video SEO notes, quality checklist, and best use cases guide.
If you decide to use a tool, judge it by whether it helps you choose better source material, make clearer scripts, and publish readable videos more efficiently. That practical test matters more than any generic promise of speed.
Blog2Vid can support that workflow, but the editorial judgment still belongs to you: good source, clear script, readable visuals, and a format matched to the audience.

[…] a fuller production workflow, see a beginner-friendly process for turning a blog post into video, a checklist for script, visuals, captions, and accessibility, and an SEO-focused guide to how […]
[…] adjacent planning, see how to turn a blog post into a video, a decision guide for repurposing blog content, the blog-to-video content quality checklist, and […]